Ring flash tutorial
|
 How
to make a $1000 ring flash for about $5 How
to make a $1000 ring flash for about $5
Article and photos by Dan of DanHarperPhotography.com and WPGphoto.com
These photos may not be reused or linked in any way without permission.
What is a ring flash?
A ring flash is a flash who's shape is that of a circle. This circle of
light is used primarily in fashion and macro photography to produce even
lighting, halo shadows and the donut catch light you see in a model's eye.
What you’ll need:
1) Cardboard (can also be made with Styrofoam) - For the actual
box
2) Scissors or xacto knife - to play soccer with, heh, ok to cut
with
3) Tape (clear duct tape is best, you can also use a stapler to quickly
attach certain joints) - to keep it all together
4) Tin foil - To make the light bounce around inside the box and
then out
5) Tissue paper or standard computer paper - to
be used as diffuser
6) You need a flash sync cord to make this work, or a really good remote
flash slave.
Making the frame
 My
Ring flash measures 15.5” tall by 12.5” wide by
3” In
depth. For macro I would recommend something smaller, for a better fashion
ring flash I would recommend something at least 10” bigger. My
Ring flash measures 15.5” tall by 12.5” wide by
3” In
depth. For macro I would recommend something smaller, for a better fashion
ring flash I would recommend something at least 10” bigger.
The following instructions depend on the size of your original cardboard
so I won’t mention sizes but only how to put it together.
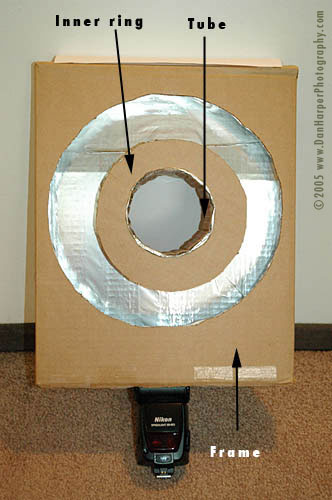
1) First, create the front of the ring flash by cutting a piece of the
cardboard to the size you want the frame to be. (If you can, don’t
just cut the 15”x12” piece, also leave 3” on each side
to act as the depth of the box)
2) Use a protractor or just circular items from around the house like
pots & pans to create the ring where light will leave the frame and
then cut it out. Be sure to leave the right amount of space at the bottom
of the frame for the flash. In other words leave about 3 inches at the
bottom of the frame and cut the circles from the top of the cardboard.
Draw two circles, about 3” in circumference from each other to
allow light to pass through. IMPORTANT: When cutting remember to keep
the inner ring.
3) Create the back of the frame the same size as the front.
4) Line the WHOLE INSIDE of the frame with tinfoil (the shiny side not
the dull side of the tinfoil) including the tube and the top, bottom,
sides, front and back of the frame. Everything should be covered in order
to reflect light.
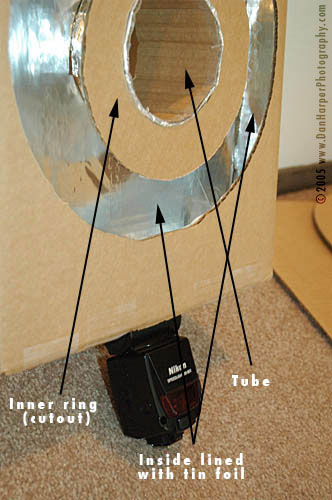
5) From a strip of cardboard make a tube that fits inside the cut out
inner ring as seen in Diagram #1.
6) Cut the same size hole at the back as the original inside circle.
This is for the tube to go through and should be the same size as the
tube you made as the camera will go through the inside of both sides
of the frame to shoot through. Then place the cut out piece (inner ring)
over the tube as in Diagram #1.
7) Tape it all together with the cut out piece and tube attaching to
the back of the frame so you have a floating circle through which to
shoot.
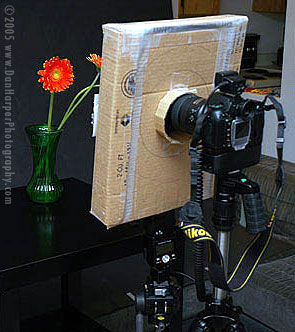
8) Take another strip of cardboard and fit it snugly around the head
of your flash. Tape that piece together over the flash (but don’t
tape it to the flash and then insert and attach it to the bottom of the
frame.
Now tape two sheets of paper together and then tape them over the front of the
flash to act like a diffuser.
|